Monday, November 2, 2009

Using Windows ReadyBoost to speed up your computer

Windows ReadyBoost started a few years ago and is available on Windows Vista and Windows 7.  It is designed to use the extra space on your flash drive as an extra drive for disk cache.  If you don't have much ram on your computer and you have an extra flash drive laying around, this is a good way to help speed up your computer.  When you plug your usb into your computer Windows will determine if your flash drive is capable of working with ReadyBoost.  Here is how it is done:

It is very simple to get ReadyBoost up and running on your computer.  

Simply locate your flash drive under My Computer and right click on it.

Click Properties on the drop down list.

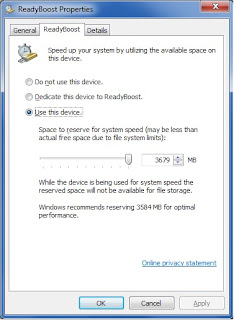
Next, navigate to the ReadyBoost tab.  Your screen should look like the one below.  Make sure the Use this device option is checked and then slide the bar to how much space you want to use for Readyboost.  I have mine set to all of the free space that is left on my flash drive.

You may have to come back to these options and turn ReadyBoost temporarily off if you plan on using your flashdrive for storage.  Then, starting it again when you add files to it and re-sizing the Readyboost file again.


Wednesday, September 23, 2009

How to speed up Shut Down time in Vista

If it takes a long time for your computer to shutdown, you may need to limit the time that Vista takes before deciding to automatically shutting down a program on your computer.  Lowering this setting should not cause any problems if you save your work and close open applications before shutting down.

1.  The first thing you want to do is open up your Registry Editor by clicking Start and then typing regedit in the Start Search box.  Click enter to open this up.

2.  If you are unfamiliar with the Registry Editor, it should look like this when opened up:

Now, you need to navigate to the setting where you can change Vista's default value.


3.  Do this by going to HKEY_LOCAL_MACHINE\SYSTEM\CurrentControlSet\Control.


4.  To the right, the last setting you see should say WaitToKillServiceTimeout.  Right click this and click Modify.  Value Data is where you want to change this value.


5.  What to change it to is the question.  Vista has is set to 20000 by default which means 20 seconds.  I wouldn't recommend setting this anywhere below 3000 and at the lowest, 2000.  Right now,  I have mine set at 3000, which is 3 seconds.  You can experiment setting it lower at your own risk.  If you have problems with Vista shutting down too fast, simply raise the time to a higher value.

Wednesday, September 9, 2009

How To Get Programs To Open Automatically On Startup

Everybody has a couple of their favorite programs that they always open up immediately when their computer loads up.  What if there was a way to get those programs to load up automatically when your computer is booted up?  Well there is, and it is very quick and easy to do for anyone no matter what experience you have with computers.

1) The first thing you need to do is decide what programs you would like to open upon Startup.  Some ones that people use are your Internet (such as IE or Mozilla), Email (such as Outlook or Windows Live), or any other programs you would like automatically opened.


2)  The first thing you do is navigate your mouse to the Start menu and right-click it.  Then click on Open All Users.


3)  Once this window opens,  double click the Programs folder.  This is just a list of your Start menu folders.  Scroll down to your Startup folder and drag and drop or copy and paste the program into this folder.


4)  Now, whenever your computer is restarted, whatever program you dragged into this folder should immediately open up with the rest of your programs.

Tuesday, September 8, 2009

Free Programs That Every Computer Should Have...

This is just a list of some of the programs that I think every user should have:

1)  CCleaner - CCleaner is a program that should be on everyone's computer.  It is a great program that  removes unused files, clears internet history, uninstalls programs, and also has a registry cleaner.  It frees up space on your hard drive and allows your computer to run faster.

2)  iTunes -  iTunes is not just your standard music player.  It is also a music store and a necessity for Ipod/Iphone owners.

3)  uTorrent - For you bit torrent users out there, uTorrent is the best client you can use for it.  It's user friendly design and ability to have multiple simultaneous downloads/uploads makes it a must-have program.  It doesn't use a lot of system resources so you barely feel it's presence while it's running.

4)  Google Earth - This isn't necessarily a must have program, but it's definitely one of the coolest.  It allows you to travel the Earth from the comfort of your home.  Check out places you've always wanted to see, view maps, look at topographical information, view buildings in 3D mode, or even check out your own house.  Now, it also has the options to view the Moon, Mars, and Outer Space.

5)  Driver Max - This is a good program that automatically searches for updated drivers for your computer.  When you run Driver Max, it builds a list of all of your drivers, informs you which ones you need to download, and then gives you the file to download.  This is a great way to keep your computer up to date and running smoothly.

6)  CPU-Z - CPU-Z shows you the valuable system information about your computer and components.  It shows you cpu, mainboard, memory, and system information.

7)  Mozilla Firefox - If you don't have Firefox yet, what are you waiting for?  IE is garbage compared to this browser.  It is definitely the most superb browser as it is more secure, faster, and just better all around.  The ability to add many different add-ons, privately browse, tabbed browsing, remember your passwords, etc... are just a few reasons you should switch to Firefox.

8)  Steam - Steam is a great gaming application that lets you download a lot of new games as they come out.  It's come along since I used it to play Counter Strike and Day of Defeat many years ago.  It allows you to access your favorite games, add friends and chat with them while in games, see new and upcoming games, and play in mulitplayer servers online.

9)  Rainmeter - This is a pretty cool desktop customization program.  I just started messing with it recently but it's fairly easy to figure and fun to mess with.  It has apps such as cpu resources, music players, RSS feeds, battery power, email, weather, etc....  Also, it doesn't use a lot of resources like a lot of programs like this use.  Here is a pic of what my Windows 7 desktop looks like with Rainmeter.


This is all that I have time to do for now.  I will update as I find new programs as well.  If there are any programs you think I should add, let me know.
Google vs Bing search engine comparer...

I saw this new website in Maximum PC's magazine and thought it was pretty cool.  It lets you search both Google and Microsoft's new search engine Bing and compares the results beside each other in one screen.  I'm a Google fan, personally, but it gives Bing skeptics a chance to compare the results with Google's.

www.bing-vs-google.com

Tuesday, September 1, 2009

Setting your default Operating System on a dual-boot system

When you have a dual-boot system set up on your machine, you are prompted at startup to choose which Operating System you would like to load. Also, there is a timer set by default to 30 seconds which automatically loads your default OS if you do not pick one within the time allotted.
This short tutorial will show you how to change your default OS and also how to change the amount of time it takes to automatically start your OS.
On my system, I have Windows Vista and Windows 7 RC. I changed the default OS to Vista and the Startup time to 20 seconds.

1. The first thing you want to do is open up your Control Panel by clicking the Start button.
2. Once that is open, click on System and Maintenance and then click System.
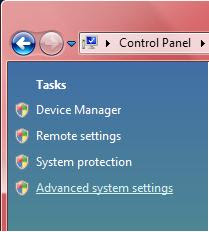
3. Now, in the left pane, click Advanced System Settings as shown in the picture below.
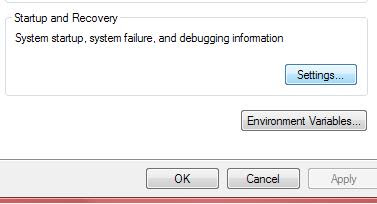
4. Locate the Advanced tab and then click Settings under Startup and Recovery.
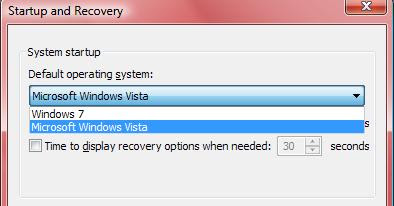
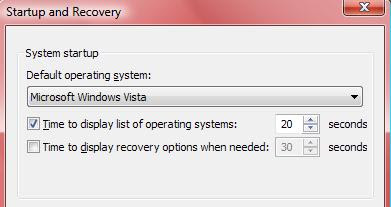
5. Now, in the System Startup group, you will see the options to set your default OS, and also to set the time that list of operating systems will remain on screen before the default OS is loaded.


In the picture below, I am choosing whether I want my default OS to be Windows 7 or Windows Vista.


In the picture below, you can see that there is a check in the Time to display list of operating systems: check box and I have mine set to 20 seconds.

Monday, August 31, 2009

How to dual boot with Windows Vista and Windows 7.

I just added this dual boot system to my machine. It's not too technically difficult to be able to setup dual booting between two operating systems. You're going to need a little knowledge on how to resize your partition to be able to fit both OS's on your hard drive. I'm going to walk you through each step in setting up a dual boot setup.

Step 1 - The first thing you will need to do is get a copy of the Windows 7 RC that is on Microsoft's website. This will be an .ISO file so you will need to either burn it to a disc or boot it from a USB drive. There will a 32bit option and 64bit option of the OS for you to download. Make sure you know if you processor supports 64bit or not.

Step 2 - Once you have the Windows 7 .ISO file downloaded, it is time to burn it to a disc. There are lot of free .ISO burning programs out there. A simple Google should land you on a program that will burn this file.
Step 3 - Now comes the part that could be tricky for some. Resizing your partition. Hopefully these steps will be easy for everyone to follow.

Before you mess with your partitions, it's never a bad idea to back up your valuable data

1. Click the Start Menu
2. Right click on "Computer"
3. Then click "Manage"
4. Click "Continue" if you have UAC controls turned on.
5. Navigate in the pane on the left and find "Storage". Open up that menu and then click "Disk Management"


Your window should now look similar to the one above. Your main drive should be C: and you might have a D: recovery drive as well. My drive labeled G: is what I have Windows 7 installed on. As you can see, it was only set to 70 GB.
6. Now decide what partition you would like to resize. When you decide, right click on it and then select "Shrink Volume".
7. After clicking Shrink Volume, the box below will come up. This is where you decide how much space you want to take off of that partition and put towards the new one. You don't need too much space for this. It is recommended to use at least 20GB but the more the better. I used 70GB for mine. (You can also resize these later as needed using the same method as above.) It will be shown in MB's so for example you want to shrink your partition from 250GB to 240GB, you would enter 10000 into the box, shrinking the partition by 10GBStep 4 - Now it's time for the installation of the OS. Insert the CD that you burned the Windows 7 image file on and put it into your CD/DVD drive. Restart your computer and enter the BIOS. (Usually done by hitting del or F12 during the splash screen.) You need to change the boot sequence so it will boot off of the CD and not from the hard drive like normal. Change the 1st boot order to your CD/DVD drive, Save, and Exit the BIOS.
Step 5 - The first screen you come to will prompt you to decide whether you want to Upgrade to a newer version of Windows or a "Custom" Install. You want to choose Custom.
Step 6 - Now, you choose which partition you want to put Windows 7 on. Choose the partition that you just created (It should be easy to recognize because of the size that you set it to.) Click the partition you want then click Next. Now, Windows will handle the rest by itself.

It may take a while to finish the installation but once it is done, you will have a fully functioning dual boot system with Windows Vista and the Windows 7 RC. Remember to go back into the BIOS and change your boot sequence back to normal when you are done. Now, when you start your PC, you will be presented with the option of booting with either OS. Usually there is a default time setting where the default OS will boot after 30 seconds. To learn how to change that amount of time and which OS you want to be the default, click here.


Thanks for reading.